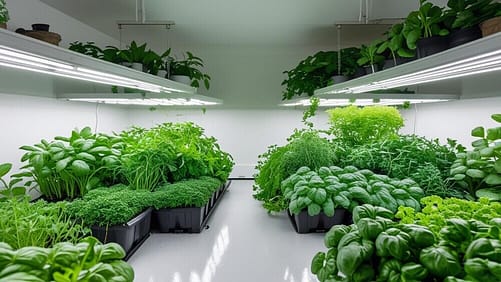
 Growing fresh herbs indoors year-round isn’t just a dream—it’s an achievable reality with the right lighting setup. Whether you’re a complete beginner taking your first steps into indoor gardening or an experienced grower looking to optimize your harvest, understanding lighting is the key to transforming any space into a thriving herb sanctuary.
At Grow and Glow Garden, we believe in nurturing both plants and people through sustainable, organic growing practices that anyone can master. Let’s illuminate the path to your perfect indoor herb garden.
Understanding Light: The Foundation of Indoor Growing
Plants don’t just need light—they need the right kind of light. Natural sunlight provides a full spectrum of wavelengths, but most indoor spaces don’t receive adequate light intensity or duration for robust herb growth. This is where artificial lighting becomes your green-thumbed ally.
The Science Made Simple
Herbs require light for photosynthesis, the process that converts light energy into plant food. Different herbs have varying light requirements, measured in:
- Light Intensity (PPFD): How much light hits your plants per second
- Photoperiod: Duration of light exposure daily
- Light Spectrum: Different colors (wavelengths) that affect growth stages
Most culinary herbs thrive with 12-16 hours of quality light daily, with intensity levels between 200-400 PPFD for optimal growth.
Step 1: Assess Your Space and Choose Your Herbs
Before selecting lighting, evaluate your growing area and choose herbs that excel under artificial lighting.
Top Artificial Light Champions:
Beginner-Friendly Options:
- Basil: Thrives under LED lights, rapid growth
- Cilantro: Low light tolerance, perfect for fluorescent setups
- Chives: Extremely hardy, grows well under any artificial light
- Oregano: Compact growth, ideal for small light footprints
Intermediate Choices:
- Mint: Vigorous growth under proper lighting
- Parsley: Steady producer with consistent light
- Thyme: Develops intense flavor under quality LEDs
Advanced Options:
- Rosemary: Requires intense light but rewards with aromatic yields
- Sage: Needs specific light spectrums for optimal essential oil production
Space Planning Tips:
- Measure your available area (length, width, height)
- Consider ventilation and heat management
- Plan for easy access to plants
- Factor in electrical outlet locations
Step 2: Budget-Friendly Lighting Solutions
Starting your indoor herb garden doesn’t require a massive investment. Here are proven budget-friendly options:
Compact Fluorescent Lights (CFL) – $15-40
Best for: Beginners, small spaces, heat-sensitive areas
Setup Steps:
- Choose 6500K (cool white) bulbs for vegetative growth
- Position lights 6-12 inches above plants
- Use reflective aluminum foil to maximize light distribution
- Replace bulbs every 8-10 months for optimal output
Pros: Low heat output, energy efficient, readily available. Cons: Lower light intensity, frequent bulb replacement needed
T5 Fluorescent Fixtures – $30-80
 Best for: Medium-sized gardens, consistent herb production
Installation Guide:
- Mount fixtures 12-18 inches above the plant canopy
- Use 6500K tubes for leafy herbs
- Create a simple timer system for 14-16 hour photoperiods
- Position reflectors to eliminate shadows
LED Strip Lights – $25-60
Best for: DIY enthusiasts, custom setups, tight budgets
DIY Setup:
- Purchase full-spectrum LED strips (3000K-6500K range)
- Mount on aluminum channels for heat dissipation
- Wire to a programmable timer
- Space strips 6-8 inches apart for even coverage
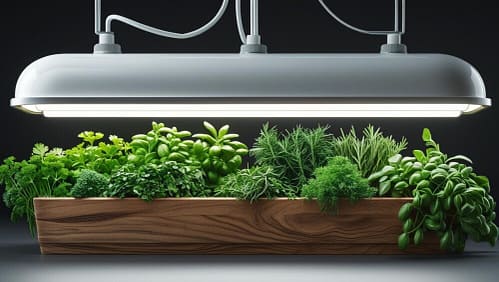
Step 3: Premium Lighting Systems
For serious herb enthusiasts ready to invest in professional-grade results:
High-Quality LED Grow Lights – $100-300
Best for: Maximum yields, energy efficiency, long-term growing
Selection Criteria:
- Look for full-spectrum LEDs (380-800nm range)
- Choose lights with adjustable intensity
- Ensure proper PAR values (200-400 PPFD for herbs)
- Select models with built-in timers and dimming
Installation Process:
- Calculate coverage area (typically 2×2 feet per 100W LED)
- Install at the manufacturer-recommended height (18-36 inches)
- Program light cycles: 16 hours on, 8 hours off
- Monitor plant response and adjust intensity accordingly
Advanced Spectrum Control – $200-500
For experienced growers: Multi-channel LED systems allowing precise spectrum control
Benefits:
- Customize light recipes for specific herbs
- Enhance flavor compound development
- Optimize growth stages independently
- Maximize energy efficiency
Step 4: Advanced Lighting Techniques
Light Cycling and Manipulation
Photoperiod Programming:
- Vegetative stage: 18 hours light, 6 hours dark
- Flavor enhancement: Reduce to 14 hours of light before harvest
- Winter simulation: Gradually decrease photoperiod for cold-hardy herbs
Spectrum Optimization
Blue Light (400-500nm): Promotes compact, bushy growth. Red Light (600-700nm): Enhances flowering and essential oil production. Full Spectrum: Maintains overall plant health and vigor
Heat Management
- Passive Cooling: Ensure 4-6 inches of clearance around lights
- Active Cooling: Install exhaust fans for high-intensity setups
- Heat Sinks: Use aluminum backing for LED installations
- Temperature Monitoring: Maintain 65-75°F at plant level
Step 5: Sustainable and Organic Integration
Energy Efficiency Strategies
- Use timers to prevent unnecessary energy consumption
- Choose ENERGY STAR-certified fixtures when possible
- Implement progressive lighting: start with a lower intensity for seedlings
- Consider solar power integration for daytime supplementation
Organic Growing Synergy
- Combine proper lighting with organic soil mixes
- Use living mulches that thrive under artificial light
- Integrate beneficial insects that adapt to light cycles
- Practice companion planting within light footprints
Step 6: Installation and Setup
Safety First Installation
- Electrical Safety: Use GFCI outlets near water sources
- Secure Mounting: Ensure fixtures can support the weight plus a safety margin
- Heat Protection: Keep flammable materials away from hot fixtures
- Timer Integration: Install 24-hour programmable timers
Positioning Guidelines

Height Adjustment: Start high and lower gradually as plants adapt
- Even Coverage: Eliminate shadows with proper spacing
- Growth Accommodation: Plan for vertical plant expansion
Step 7: Monitoring and Optimization
Success Indicators
- Healthy Growth: Compact, well-branched plants
- Good Color: Deep green foliage (species-dependent)
- Active Growth: New leaf development every few days
- Strong Stems: Sturdy, upright plant structure
Troubleshooting Common Issues
Leggy Growth: Increase light intensity or reduce distance. Pale Leaves: Check spectrum balance, may need more blue light. Slow Growth: Verify adequate light duration and intensity. Heat Stress: Improve ventilation or reduce light intensity
Maximizing Your Harvest
Harvesting Under Artificial Light
- Morning Harvest: Collect herbs 2-3 hours after lights turn on
- Regular Pruning: Maintain bushy growth through proper cutting
- Succession Planting: Start new herbs every 2-3 weeks for continuous harvest
Extending Plant Life
- Light Adjustment: Reduce intensity slightly for mature plants
- Preventive Care: Monitor for signs of light burn or deficiency
- Seasonal Variations: Adjust photoperiods to simulate natural cycles
Year-Round Success Strategy
Creating a sustainable indoor herb garden requires patience, observation, and gradual refinement. Start with budget-friendly options to learn your plants’ responses, then upgrade components as your experience and confidence grow.
Remember, the most expensive lighting system won’t compensate for poor plant care, but the right light setup makes everything else easier. Focus on consistency—consistent lighting, watering, and attention, rather than perfection.
Your Next Steps
Ready to transform your indoor space into an herb paradise? The journey from seedling to harvest begins with a single light switch. Whether you’re starting with a simple CFL setup or investing in premium LED systems, the key is taking that first step.
Your herbs are waiting to grow and glow under your care. Start small, dream big, and watch your indoor garden flourish under perfect lighting conditions.
Ready to dive deeper into indoor gardening success? Visit our website for detailed growing guides, troubleshooting resources, and community support. Follow us on social media for daily tips, seasonal advice, and inspiration from fellow herb enthusiasts who’ve transformed their homes into year-round growing sanctuaries.
Happy growing, and may your herbs always grow and glow!
This guide was incredibly helpful—thank you! I’ve been experimenting with growing herbs indoors, but my results have been hit-or-miss. I didn’t realize how much of a difference light cycling and spectrum management could make. The suggestion to reduce light to 14 hours before harvest to enhance flavor is especially intriguing—I’ve never tried that!
I’m also curious: how soon should I begin adjusting the light schedule if I want to simulate a winter cycle for hardy herbs like thyme or sage? And when it comes to spectrum optimization, is it better to invest in full-spectrum lights from the start, or combine separate red and blue LED strips for more control?
Also loved the sustainability tips! I’ve been looking into solar-powered options and companion planting, but wasn’t sure how they’d respond under artificial lighting. Thanks again for making this all feel less intimidating.
I’m so thrilled to hear the guide helped clarify things for you! It’s amazing how much difference proper lighting makes-you’re right that it’s often the missing piece in the indoor herb growing.
For Your Winter Cycle Question: Start adjusting the light schedule about 4-6 weeks before you want to harvest those hardy herbs. Gradually reduce from your current schedule down to 8-10 hours of light daily to simulate shorter winter days. Thyme and sage develop more concentrated flavors when they think winter is coming, so you’ll love the results!
On the spectrum question: I’d recommend starting with quality full-spectrum lights if your budget allows. They’re more convenient and provide consistent results. However, if you enjoy experimenting (which it sounds like you do), separating red and blue strips gives you incredible control. You can fine-tune the ratios for different growth stages- more blue for compact, leafy growth, and more red when you want to encourage essential oil production.
For your solar and companion planting interests: Solar-powered setups work beautifully with timer systems, especially for herbs that don’t need intense lighting. As for companion planting under artificial lights, most traditional combinations still work -basil with tomatoes, chives with parsley, etc. The key is matching plants with similar light requirements.
You’re developing a knack for this! The fact that you’re thinking about flavor enhancement and sustainability shows you’re moving beyond just “keeping plants alive” to truly optimizing their growth. Keep experimenting – that’s where the real breakthroughs happen!
Oh wow, what I wouldn’t do to have a herb sanctuary that looks like the picture on this article. Unfortunately half my herbs have died. I never thought of planting them indoors though and you have provided thorough instructions here on just how to go about doing this. I mean, 12 to 16 hours of light is much more than they will get growing outside.
You say that Rosemary seems to be the hardest to grow indoors, but funnily that is the only one I have outdoors that hasn’t died. Is this because Rosmary prefers outside light to artificial light?
Hi Michel
I’m so glad the guide has inspired you to consider indoor herb gardening! It sounds like you’d be a great candidate for it, especially since you’ve already experienced the challenges of outdoor growing.
Yes, absolutely about rosemary being tricky indoors, and your observation is spot-on! Rosemary thrives outdoors because it’s naturally adapted to Mediterranean conditions – it loves that intense, full-spectrum sunlight, excellent drainage, and natural air circulation. While it can survive under artificial lights, it often struggles with the varying humidity levels and indoor air circulation patterns.
Your outdoor rosemary is doing well because it’s getting exactly what it craves- that natural light intensity and airflow. If you do decide to try rosemary indoors eventually, I’d recommend using a high-quality, full-spectrum LED light and positioning a small fan nearby for air circulation.
The great news is that most other herbs (basil, cilantro, parsley, oregano) adapt beautifully to indoor conditions with proper lighting! You might find indoor growing much more rewarding than battling outdoor elements.”
Garfield