Transform your darkest corners into thriving herb sanctuaries with these proven low-light propagation methods
Table of Contents
- Understanding Low-LightLow-Light Propagation
- Essential Tools and Materials
- Best Herbs for Low Light Propagation
- Step-by-Step Propagation Methods
- Creating the Perfect Low-Light Environment
- Troubleshooting Common Issues
- Advanced Techniques
- Maintenance and Care
Understanding Low-Light Propagation
Low light propagation is the art of starting new herb plants in conditions with minimal natural sunlight, typically areas receiving less than 4 hours of direct sunlight daily or spaces illuminated only by artificial lighting. This technique opens up endless possibilities for urban gardeners, apartment dwellers, and anyone with limited sunny window space.
What Constitutes “Low Light”?
- Foot-candles: 200-800 foot-candles (compared to 1,000+ for full sun)
- Natural light: North-facing windows, areas 6+ feet from south windows
- Artificial light: Standard LED bulbs, fluorescent lighting
- Duration: Less than 6 hours of quality light per day
Why Low Light Propagation Works
Many herbs are remarkably adaptable and can establish root systems even in subdued lighting conditions. The key lies in understanding that propagation requires less energy than active growth, making it possible to start plants successfully before transitioning them to brighter locations.
Essential Tools and Materials
Basic Propagation Kit
- Sharp, clean scissors or pruning shears
- Glass jars or propagation containers
- Rooting hormone (optional but recommended)
- pH testing strips
- Small containers with drainage holes
- High-quality potting mix
- Humidity dome or clear plastic bags
- Spray bottle for misting
Low-Light Specific Equipment
- Grow light strips or compact fluorescent bulbs
- Timer for consistent lighting schedules
- Reflective materials (aluminum foil, mirrors)
- Light meter or smartphone app
- Heat mat for bottom warmth
Advanced Materials
- Perlite and vermiculite for custom propagation mix
- Kelp meal for natural growth stimulation
- Activated charcoal for water propagation
- Node identification magnifying glass
Best Herbs for Low Light Propagation
Excellent Low Light Candidates
Mint Family (Easiest)
- Peppermint, spearmint, chocolate mint
- Success rate: 95%+ in low light
- Propagation time: 7-14 days for roots
Basil Varieties
- Sweet basil, Thai basil, lemon basil
- Success rate: 85% in low light
- Propagation time: 10-21 days for roots
Mediterranean Herbs
- Oregano, thyme, sage
- Success rate: 75% in low light
- Propagation time: 14-28 days for roots
Moderate Low Light Success
Rosemary
- Requires patience and extra care
- Success rate: 60% in low light
- Propagation time: 21-45 days for roots
Cilantro/Coriander
- Best from seed in low light conditions
- Success rate: 70% from seed
- Germination time: 7-14 days
Challenging but Possible
Parsley
- Flat-leaf varieties perform better than curly ones
- Success rate: 50% in low light
- Propagation time: 21-35 days
Step-by-Step Propagation Methods
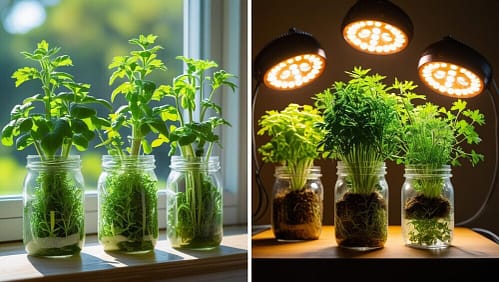
Method 1: Water Propagation (Beginner-Friendly)
Step 1: Select Your Cuttings. Choose healthy stems 4-6 inches long with at least 3-4 sets of leaves. Morning collection provides the best hydration levels.
Step 2: Prepare the Cutting
- Make a clean cut just below a node (the bump where leaves emerge)
- Remove the lower leaves that would sit underwater
- Optional: Dip in rooting hormone for faster results
Step 3: Set Up Water Environment
- Fill a clean glass jar with room temperature water
- Add a small piece of activated charcoal to prevent bacterial growth
- Place cutting so that nodes are submerged, but leaves remain above water
Step 4: Optimize for Low Light
- Position 12-18 inches from any available light source
- Use reflective material behind the container to maximize light exposure
- Maintain water temperature between 65-75°F
Step 5: Monitor and Maintain
- Change water every 3-4 days
- Look for white root nubs after 7-14 days
- Transfer to soil when roots reach 1-2 inches long
Method 2: Soil Propagation (Higher Success Rate)
Step 1: Create Propagation Mix. Combine equal parts:
- High-quality potting soil
- Perlite for drainage
- Vermiculite for moisture retention
Step 2: Prepare Containers
- Use 3-4 inch pots with drainage holes
- Fill with propagation mix, leaving ½ inch at the top
- Water until evenly moist but not soggy
Step 3: Plant Your Cuttings
- Make holes with a pencil or your finger
- Insert cuttings 1-2 inches deep
- Firm soil gently around the stem
- Space multiple cuttings 2 inches apart
Step 4: Create a Humidity Chamber
- Cover with a clear plastic bag or humidity dome
- Use chopsticks to keep plastic from touching leaves
- Ensure some air circulation to prevent mold
Step 5: Maintain Optimal Conditions
- Keep soil consistently moist but not waterlogged
- Provide 12-16 hours of artificial light daily
- Maintain temperature between 65-75°F
Method 3: Paper Towel Propagation (Space-Saving)
Step 1: Prepare Materials
- Dampen paper towels until moist but not dripping
- Lay flat in a shallow container or a zip-lock bag
- Ensure the container can be sealed for humidity
Step 2: Position Cuttings
- Place prepared cuttings on damp paper towels
- Ensure nodes contact the moist surface
- Don’t overlap stems
Step 3: Seal and Place
- Cover or seal the container
- Place in an area with indirect light
- Check daily for root development
Step 4: Transfer When Ready
- Move to water or soil once roots appear
- Handle delicate new roots carefully
- Gradually acclimate to normal humidity levels
Creating the Perfect Low-Light Environment
Maximizing Available Light
Reflection Techniques
- Place a white poster board or mirrors behind plants
- Use aluminum foil on walls to bounce light
- Position near light-colored surfaces
Strategic Placement
- Rotate plants daily for even light exposure
- Group plants together to create a favorable microclimate
- Elevate containers closer to light sources
Artificial Light Supplementation
- Add 12-14 hours of LED or fluorescent light daily
- Position lights 6-12 inches above cuttings
- Use timers for consistent light cycles
Environmental Control
Temperature Management
- Maintain a steady 65-75°F temperature
- Use heat mats for bottom warmth if needed
- Avoid temperature fluctuations
Humidity Control
- Target 60-70% relative humidity
- Use humidity domes or clear containers
- Mist air around plants (not directly on leaves)
Air Circulation
- Provide gentle air movement
- Use a small fan on the lowest setting
- Open humidity chambers briefly daily
Troubleshooting Common Issues
Problem: Slow or No Root Development
Symptoms: No visible roots after 3-4 weeks. Solutions:
- Check if cuttings were taken from flowering stems (use vegetative growth instead)
- Increase humidity around cuttings
- Try rooting hormone if not been used previously
- Ensure nodes are present and in contact with the growing medium
Problem: Cutting Stems Turning Black
Symptoms: Darkening from the cut end upward. Solutions:
- This indicates a bacterial or fungal infection
- Take fresh cuttings with sterilized tools
- Improve air circulation
- Reduce watering frequency
- Start over with clean containers and fresh water/soil
Problem: Leaves Yellowing and Dropping
Symptoms: Lower leaves turning yellow and falling off. Solutions:
- Normal response to low light conditions
- Ensure adequate humidity
- Don’t overwater
- Consider adding supplemental lighting
Problem: Leggy, Weak Growth
Symptoms: Stems stretching toward the light source. Solutions:
- Add more artificial lighting
- Move closer to the existing light source
- Pinch growing tips to encourage bushier growth
- Rotate containers regularly
Problem: Mold or Fungal Growth
Symptoms: White fuzzy growth on soil or stems. Solutions:
- Increase air circulation immediately
- Reduce humidity and watering
- Remove affected plant material
- Apply cinnamon powder as a natural fungicide
Advanced Techniques
Layering for Difficult-to-Root Herbs
Air Layering Method:
- Select a healthy branch on the parent plant
- Make a small wound in the stem bark
- Wrap with moist sphagnum moss
- Cover with plastic wrap and secure
- Roots form while still attached to the parent plant
Ground Layering:
- Bend the flexible stem to the soil level
- Wound the stem where it touches the soil
- Pin down with a wire or a small stone
- Cover with soil, leaving the tip exposed
- Separate once the roots establish
Grafting for Unusual Varieties
Approach Grafting:
- Useful for combining hardy rootstock with the desired variety
- Particularly effective for rosemary and sage
- Requires patience but increases success rates
Tissue Culture Basics
Simple Home Setup:
- Use sterile techniques for propagating small tissue samples
- More challenging, but allows propagation from minimal plant material
- Best for rare or hard-to-find herb varieties
Division and Crown Splitting
Root Division Method:
- Carefully remove the established herb from the container
- Gently separate root clumps with clean hands or a knife
- Ensure each division has both roots and growing shoots
- Plant divisions in individual containers
- Works excellently with chives, oregano, and mint
Crown Splitting Technique:
- Ideal for perennial herbs like tarragon and chives
- Use a sharp, sterile knife to cut through the crown
- Dust cut surfaces with cinnamon to prevent rot
- Allow cut surfaces to dry for 2-3 hours before planting
the
Jade Plant and Succulent Herb Method:
- Gently twist healthy leaves from the stem (don’t cut)
- Allow the leaf to callus for 24-48 hours in a dry location
- Place on a well-draining soil mix
- Mist lightly every few days
- Works with purslane, jade plant (used medicinally)
Root Cutting Propagation
Underground Propagation:
- Cut 2-3-inch sections of thick roots from mint or horseradish
- Plant horizontally 1 inch deep in propagation mix
- Keep consistently moist but not waterlogged
- New shoots emerge from buried root sections
- Excellent for expanding mint colonies in low light
Seed Scarification for Hard-to-Germinate Herbs
Physical Scarification:
- Gently nick hard seed coats with fine sandpaper
- Soak in warm water for 12-24 hours
- Plant immediately in the propagation mix
- Particularly effective for lavender and rosemary seeds
Chemical Scarification:
- Brief vinegar soak (5-10 minutes) for stubborn seeds
- Rinse thoroughly before planting
- Use only for seeds that typically have low germination rates
Hydroponic Propagation Systems
Deep Water Culture for Cuttings:
- Set up a small DWC system with an air pump
- Use rockwool or rapid rooter plugs
- Maintain pH 5.5-6.5 in the nutrient solution
- Provide gentle aeration for faster root development
- Transfer to soil once roots are 2-3 inches long
Kratky Method (Passive Hydroponics):
- Fill the container with the nutrient solution
- Place the cutting in the net pot with the growing medium
- Solution level drops as the plant grows, creating an air gap
- Roots develop both water and air roots
- No electricity required – perfect for low-light areas
Propagation Through Node Burial
Stolon Encouragement:
- Identify herbs that naturally produce runners (mint, thyme)
- Pin runner nodes to the soil surface while still attached
- Cover nodes lightly with propagation mix
- Keep moist until roots develop at each node
- Cut connections once new plants establish
Cold Stratification for Difficult Seeds
Refrigerator Method:
- Mix seeds with slightly damp sand or peat moss
- Place in a sealed plastic bag
- Refrigerate for 30-90 days, depending on species
- Plant after cold treatment in low-light conditions
- Essential for lavender, rosemary, and some sage varieties
Propagation Matrix System
Grid Propagation Setup:
- Create a grid system using egg crates or custom dividers
- Each cell contains different propagation experiments
- Test multiple techniques simultaneously
- Track success rates across methods
- Optimize your specific low-light conditions
Companion Propagation
Nurse Plant Method:
- Use established, hardy herbs as “nurse plants.”
- Place difficult cuttings near healthy plants
- Established plants create a favorable microclimate
- Share beneficial root associations and humidity
- Particularly effective for rosemary and sage cuttings
Wicking System Propagation
Self-Watering Setup:
- Use a container with a water reservoir below the growing medium
- Insert a fabric or string wick from the water to the propagation area
- Maintains consistent moisture without overwatering
- Ideal for extended periods without daily attention
- Perfect for basement or closet propagation areas
Mist Propagation Chamber
DIY Misting System:
- Construct an enclosed chamber with automatic misting
- Use an ultrasonic humidifier or spray bottle system
- The timer controls the misting frequency
- Maintains 80-90% humidity for challenging cuttings
- Especially effective for woody herbs like rosemary
Specialized Propagation Techniques by Herb Type
Basil-Specific Methods:
- Flower Spike Propagation: Use flowering stems (remove flowers first)
- Water-to-Soil Bridge: Start in water, gradually add soil around roots
- Companion Cutting: Pair with an established mint for better success rates
Mint Family Advanced Techniques:
- Intermodal Cutting: Cut between nodes for maximum rooting potential
- Chocolate Mint Layering: Bury runners while attached to the parent plant
- Steam Propagation: Use warmth from the shower steam to boost humidity
Rosemary Breakthrough Methods:
- Heel Cutting: Take a cutting with a small piece of the main stem attached
- Wounded Stem: Lightly scrape the bark before rooting hormone application
- Sand Propagation: Use pure sand for better drainage and root development
Sage and Woody Herb Techniques:
- Semi-Hardwood Timing: Take cuttings when stems are partially woody
- Bottom Heat Method: Use heating mats for a consistent 75°F soil temperature
- Gradual Light Increase: Start in very low light, increase weekly
Seasonal Adaptation Techniques
Winter Propagation Strategies:
- Greenhouse Effect: Use clear storage bins as mini-greenhouses
- Heat Sink Method: Place containers near radiators or heat sources
- Supplemental CO₂: Add small amounts via fermentation bottles
Spring Activation Methods:
- Pre-Season Preparation: Start cuttings 6 weeks before the last frost
- Hardening Bridge: Gradual outdoor exposure preparation
- Natural Light Maximization: Track sun patterns and adjust positioning
Summer Adaptation:
- Heat Stress Prevention: Use cooling mats or ice packs around containers
- Increased Humidity: Combat dry air with multiple humidity sources
- Air Circulation Boost: Prevent fungal issues in warm, humid conditions
Innovation Techniques for Limited Space
Vertical Propagation Walls:
- Mount shallow containers on walls at different heights
- Use a drip irrigation system for consistent watering
- Rotate containers weekly for even light exposure
- Create living herb propagation art installations
Magnetic Container System:
- Use magnetic containers on the refrigerator or metal surfaces
- Easy repositioning to follow available light
- Space-saving solution for tiny kitchens
- Quick monitoring and maintenance access
Hanging Propagation Gardens:
- Suspend containers at various heights
- Create a cascading effect with trailing herbs
- Maximize overhead light capture
- Easy rotation and care access
Propagation Acceleration Techniques
Rooting Hormone Alternatives:
- Willow Water: Soak willow branches, use tea for natural rooting hormones
- Honey Solution: Natural antibacterial and rooting stimulant
- Cinnamon Powder: Antifungal properties, light rooting stimulation
- Aspirin Water: Salicylic acid promotes root development
Growth Stimulation Methods:
- Kelp Meal Tea: Soak kelp meal, use liquid for natural growth hormones
- Epsom Salt Solution: Magnesium boost for healthier cutting development
- Compost Tea: Gentle nutrition and beneficial microorganisms
- Fish Emulsion Dilution: Very weak solution for established cuttings only
Problem-Solving Propagation Methods
Rescue Propagation:
- Salvage cuttings from dying or diseased plants
- Emergency propagation when the parent plant is struggling
- Quick multiplication before plant loss
- Disease isolation and clean propagation restart
Revival Techniques:
- Shock Treatment: Brief cold or heat exposure to stimulate dormant buds
- Stress Propagation: Slight water stress before taking cuttings
- Chemical-Free Recovery: Natural methods for failed first attempts
Cultural and Medicinal Herb Specialties
Traditional Propagation Wisdom:
- Moon Phase Timing: Align cutting collection with lunar cycles
- Seasonal Energy: Harvest during peak plant energy periods
- Companion Planting: Use beneficial plant relationships during propagation
Medicinal Herb Considerations:
- Potency Preservation: Maintain active compounds during propagation
- Stress Minimization: Reduce trauma to preserve medicinal qualities
- Clean Technique: Extra sterility for herbs used medicinally
Maintenance and Care
Transitioning to Regular Growing Conditions
Gradual Acclimation Process:
- Week 1: Increase light exposure by 1-2 hours daily
- Week 2: Reduce humidity gradually
- Week 3: Begin normal watering schedule
- Week 4: Transplant to permanent containers
Long-Term Success Strategies
Root Development Monitoring:
- Check root growth weekly
- Look for white, healthy root tips
- Avoid disturbing roots unnecessarily
Feeding Young Plants:
- Wait 2-3 weeks before the first fertilization
- Use diluted liquid fertilizer (¼ strength)
- Focus on balanced NPK ratios
Ongoing Care Schedule:
- Daily: Check moisture levels and overall plant health
- Weekly: Rotate containers, assess growth progress
- Bi-weekly: Clean containers, fresh water for water propagation
- Monthly: Evaluate success rates and adjust techniques
Record Keeping for Continuous Improvement
Track Success Rates:
- Note which herbs propagate best in your conditions
- Record optimal timing and environmental factors
- Document seasonal variations in success
Seasonal Adjustments:
- Winter: Increase artificial lighting duration
- Spring: Take advantage of improving natural light
- Summer: Focus on maintaining cool temperatures
- Fall: Prepare for reduced daylight hours
Building Your Propagation Schedule
Monthly Propagation Calendar:
- January: Start mint and basil cuttings
- February: Begin oregano and thyme propagation
- March: Try more challenging herbs like rosemary
- April-October: Continuous propagation cycles
- November-December: Focus on maintenance and planning
Scaling Up Your Operation
Multiple Batch Management:
- Stagger cutting times for continuous harvest
- Label containers with dates and varieties
- Maintain separate areas for different growth stages
Sharing and Trading:
- Successful propagation provides plants for sharing
- Join local herb societies or online communities
- Trade varieties to expand your collection
Conclusion
Low-light indoor herb garden propagation transforms the challenge of limited sunlight into an opportunity for creative gardening. By understanding the specific needs of different herbs and implementing these proven techniques, you can successfully propagate a wide variety of culinary and medicinal herbs regardless of your lighting limitations.
Remember that propagation is both an art and a science. Each environment is unique, and success comes through careful observation, patient experimentation, and consistent care. Start with the easier herbs like mint and basil to build your confidence, then gradually work your way up to more challenging varieties.
The techniques outlined in this guide provide multiple pathways to success. Whether you choose water propagation for its visual appeal, soil propagation for its reliability, or advanced methods for special situations, the key is maintaining optimal conditions within your specific constraints.
Your low-light herb garden can become a source of fresh flavors, natural remedies, and deep satisfaction. With these propagation skills in your toolkit, you’ll never be without fresh herbs, regardless of your indoor growing conditions.
Ready to transform your low-light spaces into herb propagation powerhouses? Start with one method, master it, then expand your skills. Your future self will thank you for every fresh herb snipped from plants you propagated yourself.
I’ve had the hardest time keeping herbs alive indoors… like seriously, I’ve lost count of how many basil and parsley plants I’ve accidentally let wilt. My apartment doesn’t get a ton of sunlight, so I’ve kind of given up until I found this article.
This was honestly one of the most helpful and detailed guides I’ve come across so far! The tips about water propagation and using foil to reflect light are things I never would’ve thought of on my own. I really liked how everything was broken down step by step, and it actually made me feel like I might be able to pull this off.
One thing I’m still unsure about though… are there any easy signs to tell if the herbs aren’t getting enough light even with those tricks?
Anyway, thanks so much for putting this together. Super helpful and way more detailed than most stuff I’ve seen online. I’m excited to give this growing herbs at home thing another try.
Thank you so much for this incredible, kind feedback! Glad to hear that the guide gave you the confidence to try again. I get that feeling of plant failure frustration- we’ve all been there with those sad, wilted herbs mocking us from the windowsill!
For your question about light deficiency signs, here are the key things to watch for:
Early warning signs:
– Leaves turning pale green or yellowish ( especially new growth)
– Stems getting “leggy” – stretching tall and thin toward any light source
– Leaves are spaced out more than usual along the stem
– Overall slower growth than expected
More serious signs:
-Lower leaves are dropping off regularly
– Stems are becoming weak and floppy
-New leaves growing smaller than older ones
– Plants leaning dramatically toward windows
The good news is that most of these issues are fixable! If you spot any of these signs, try moving your setup closer to a window, adding a simple desk lamp, or increasing those aluminum foil reflectors.
Your apartment situation is perfect for testing these techniques – you’re going to be amazed at how much difference those simple tricks make. Start with the water propagation method since it’s most forgiving, and don’t be discouraged if it takes a few tries to get the hang of it.
You’ve got this! And honestly, every successful indoor gardener has a graveyard of failed plants behind them. It’s all part of the learning process.
Happy gardening!
Garfield
Well, well, well, Garfield, I must say I’m impressed by your extensive knowledge of low-light indoor herb garden propagation techniques! Who knew you had such a green thumb hidden beneath that unassuming exterior?
Your comprehensive guide is a treasure trove of information for anyone looking to start an indoor herb garden, especially in less-than-ideal lighting conditions. The step-by-step instructions, troubleshooting tips, and advanced techniques make it accessible for beginners while offering plenty of depth for more experienced gardeners to explore.
I particularly appreciate the creative solutions you’ve provided, like using reflective materials to maximize light exposure, employing strategic plant placement, and even setting up DIY misting systems. It’s clear you’ve put a lot of thought into helping readers succeed, no matter their unique challenges.
One question that comes to mind: With your extensive experience in low-light herb propagation, have you found any surprising herb varieties that thrive in these conditions, defying conventional wisdom? I’m always eager to discover unexpected plants that can flourish in the most unlikely places!
Also, I’m curious about your journey into the world of indoor gardening. What initially sparked your passion for herbs, and how did you develop such a deep well of knowledge on the subject? I’m sure our readers would love to hear the story behind the expert!
Thank you for sharing your wisdom and practical advice with us, Garfield. Your guide is sure to inspire countless indoor gardeners to create their own lush herb oases, even in the dimmest corners of their homes. I look forward to hearing more about your experiences and insights in the realm of low-light herb propagation!
Eric
“Thank you so much for the kind words, Eric! I’m thrilled that the guide resonated with you and that you found the creative solutions helpful.
You’ve asked a fantastic question about surprisingly low-light performers! One herb that consistently surprises people is lemon balm – it’s incredibly forgiving in low light conditions and produces more tender leaves when not stressed by intense light. Chives are another unexpected champion – they’ll happily grow in conditions that would make other herbs struggle, and keep producing even in winter windowsills.
Mint varieties ( especially spearmint and peppermint) are also delightfully adaptable to lower light, though you’ll want to keep them contained since they spread aggressively even indoors! I’ve also had great success with parsley in both facing windows where many other herbs would languish.
As for my journey into indoor herb gardening, it all startedout of necessity We normally have more herbal tea than artificial tea products, you would brought from the supermarket or shop, so we get a few herbs and decide to give it a try so we could have fresh herbs for cooking, that first struggling basil plant on our windowsill taught me so much about light requirements, and I became facinated with finding ways to make it work in challenging conditions.
The troubleshooting drew me in – there’s something satisfying about solving the puzzle of getting plants to thrive in less-than-ideal spaces. Each failure taught me something new, and before I knew it, I had a whole system figured out!
Thanks for sharing your enthusiasm for unexpected gardening discoveries’s that curiosity that makes indoor gardening so rewarding!”
Garfield